


Blog
Jul 21 2015 |
How To Learn The FretboardBy: Scott Gilliam Posted in: Guitar Basics One of the main concerns for players of varying levels is knowledge of the fretboard. Specifically, being able to identify any pitch everywhere on the neck. There are a variety of ways to learn this but it seems that many guitarists don’t have a specific method. Learning the open strings and counting up and down the individual string works but it takes too long. I am going to show you how to learn the neck by using octaves.
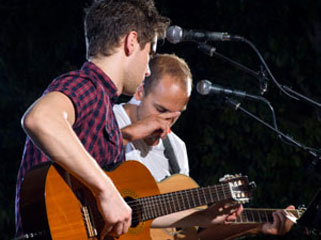
The first step will be to learn the chromatic scale on the 6th stg, which means your learning the 1st stg as well because they are the same. The chromatic scale is every pitch on the instrument and it moves in half steps. Fig 1 illustrates the chromatic scale on the low E stg. For the sake of simplicity I have elected to use all sharps and left out the enharmonic spellings. For example G# is the same pitch as Ab, A# is the equivalent of Bb, etc. From the 6th stg we will build our octave shapes and cover the entire fretboard. For our lesson, G will be the reference note so we can cover the entire neck comfortably.
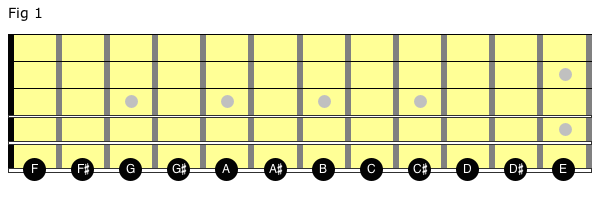 Fig 2 shows the note G on the 3rd fret 6th stg. To find the next octave we will count up two frets and up two strings. Up relates to pitch so we are moving to the higher strings toward the floor if you are holding the guitar. I play this octave with my 1st and 3rd finger.
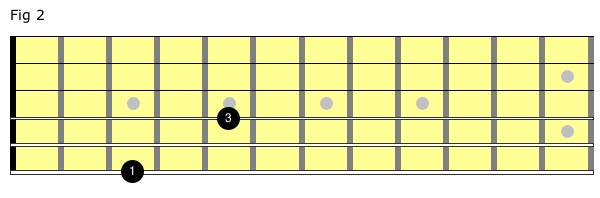 Fig 3 shows the G octave between the 4th stg and the 2nd stg. Now we count up three frets and up two strings, this is important! The reason is because the 3rd and 2nd stg are tuned a maj 3rd apart instead of a 4th like the rest of the stgs. Because of this, I use my 1st and 4th finger to play this shape. For this exercise the fingering is relevant because a pattern is emerging that will help you visualize the octaves.
 Fig 4 is what I call a pivot point. This shows the G octave between the 2nd and 5th stg. I use an open pos C shape for the visual of this relationship. The G on the 8th fr 2nd stg and the G on the 10th fr 5th stg. The C form will help you remember this so we can proceed further up the neck.
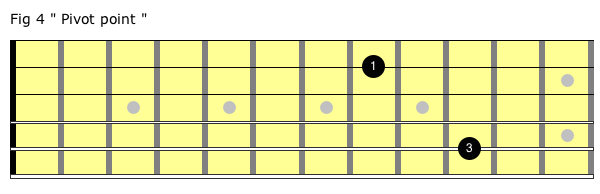 Fig 5 is the G octave between the 5th and 3rd stg. You’ll notice that we are going to repeat the same fingerings again. The octaves between stgs 6 & 4 and stgs 5 & 3 are both two frets up and two strings up. The octaves between stgs 4 & 2 and 3 & 1 are three frets apart two stgs up. These patterns alternate up and down the neck for every pitch! The layout is the same for any note you choose.
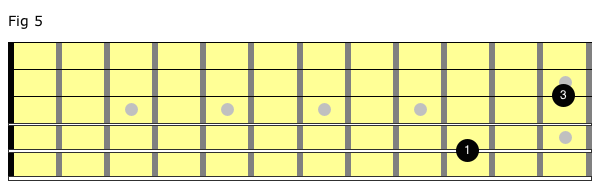 Fig 6 shows the G octave between the 3rd stg and the 1st stg. Again, I switched my fingering to 1 & 4 because we are three frets apart due to the tuning. Now we are at the 15th fr and the entire process repeats itself until you run out of frets. Any note played on the 12th fr would be an open stg also.
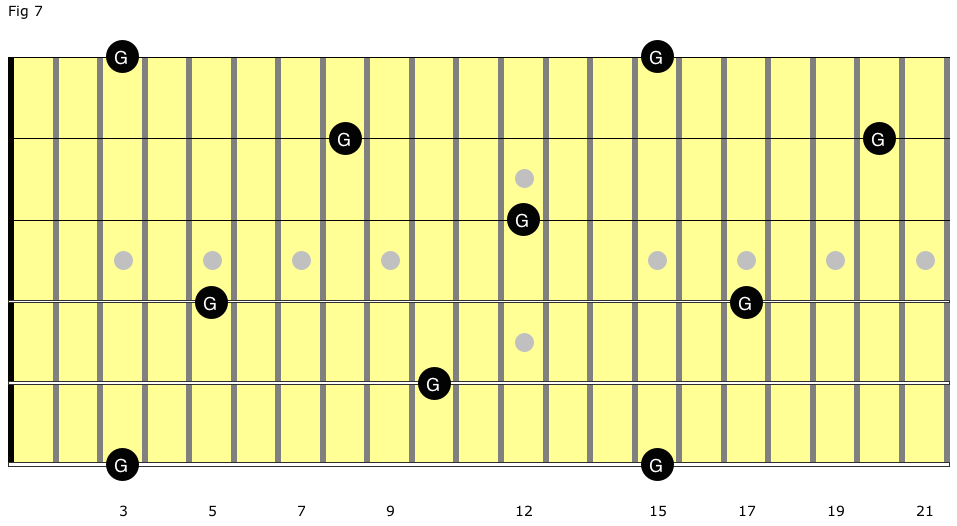
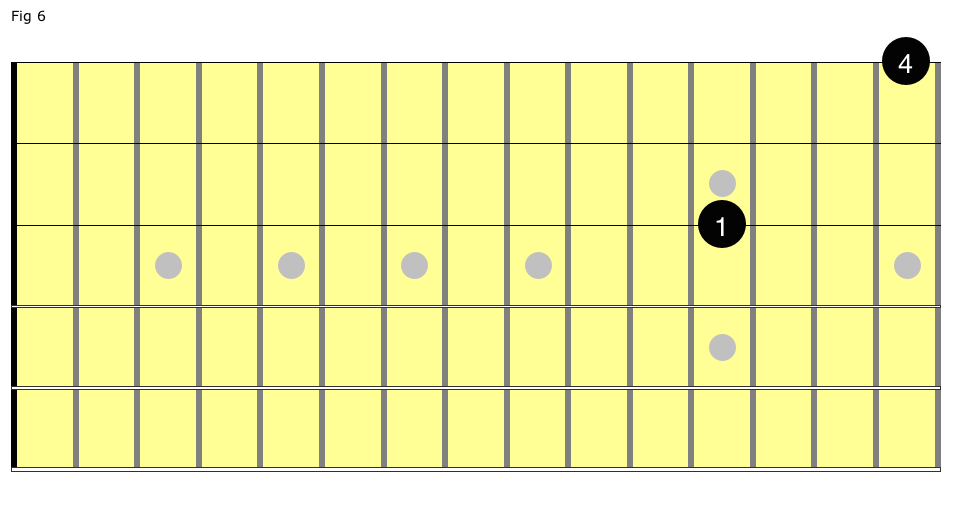 Fig 7 shows all the G’s on the entire guitar. Hopefully you can see these octave patterns after you practice them. It is so useful for chords and soloing and to help you find your desired pitches.
 After you have developed your fretboard knowledge you can start to learn scale and chord construction. Moving up and down through stepwise motion will assist in your being able to learn the notes positionally. It’s so common that guitar players memorize fingerings but are unclear as to what notes they are playing or their relationship to what is going on around them. Often the root on the 6th stg is identified and the fingers take over, and usually in one position. With some simple concepts and methodical practice you will be well versed on the geography of the guitar.
Check out the accompanying video on this lesson: How To Learn The Fretboard
|